Dealer Portal theme, web address and your own domain
Brand the portal (logos, colours, fonts), give it a web address, publish it, run it on your own domain, and put it inside your own website.
Where it is
- Dealer Portal → Setup → Theme
- Settings → Your domain — Your own address for the portal, links and emails
Settings for this
- Dealer Portal → Setup → Theme — Brand, assets, colours, fonts & style, login copy, contact & email, slug
- Settings → Your domain — Connect your own domain (DNS records, one Check now)
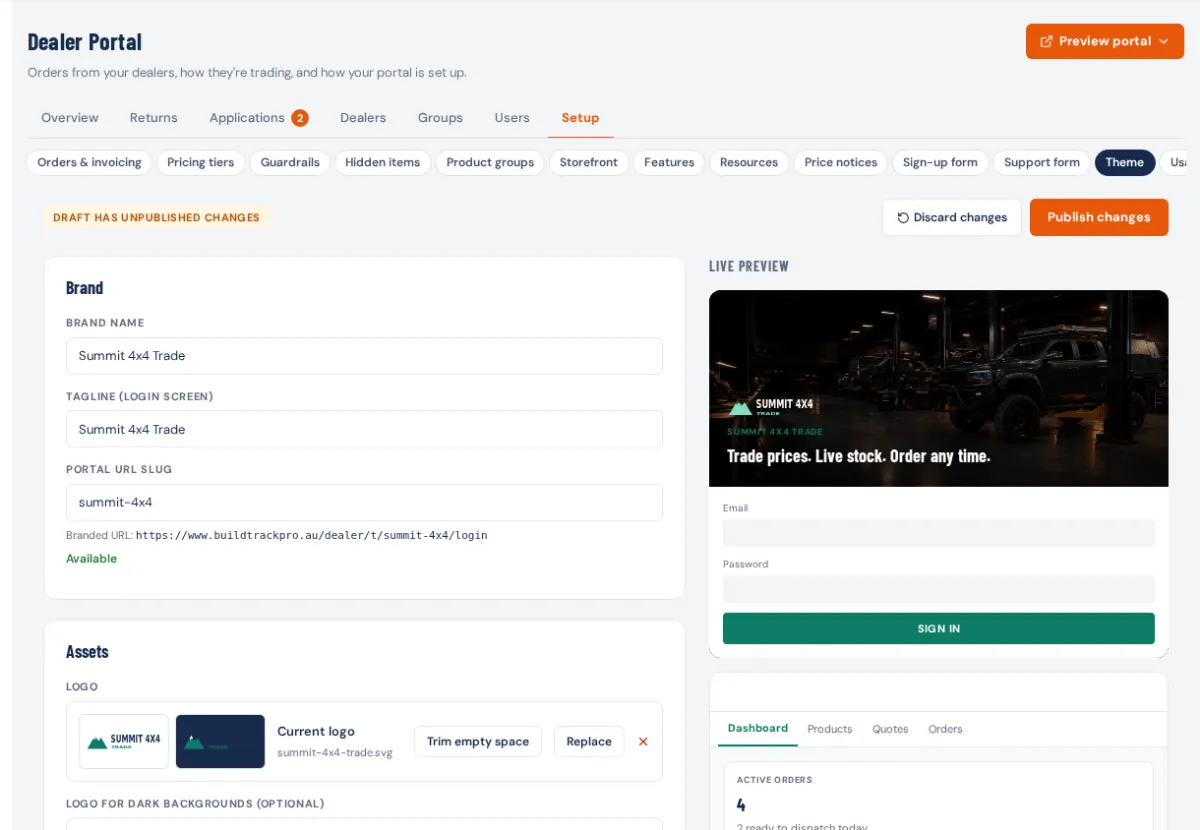
Open Dealer Portal → Setup → Theme. The form is on the left, a Live preview of the sign-in page and dashboard on the right. Only owners, admins and managers can change it.
How saving works
- Every change saves to a draft a moment after you stop typing.
- The pill says Never published, Draft has unpublished changes or Live.
- Dealers see nothing new until you press Publish changes and confirm. Discard changes puts the draft back to what dealers see now.
- Revision history keeps every publish: Restore to draft, then publish again.
Step by step
- Brand: Brand name, Tagline (login screen) and Portal URL slug: 3 to 32 lowercase letters, numbers and hyphens. Green Available means it's yours. The line underneath is the sign-in address (your BuildTrack Pro address, then /dealer/t/ your slug /login).
- Assets: Logo (transparent PNG or SVG for a light background; empty space is trimmed), Logo for dark backgrounds (optional), Hero image (sign-in background, at least 1600 × 900) and Favicon.
- Colours: Primary colour, Accent colour and Text on primary (White or Dark navy). Aim for a contrast that passes WCAG AA.
- Fonts & style: Heading font and Body font (popular Google fonts, or Other Google font… and type its name), Corners (Sharp, Soft or Round), Page background and Header background (a dark header uses your dark-background logo), and Hide the portal's logo when it's on my website.
- Login copy: Login heading and Login subhead.
- Contact & email: Email-from display name, Support email, Support phone, Website URL.
- Press Publish changes.
The published theme also brands quote and sales order PDFs sent to dealers, and invites and other portal emails. Publish before you invite anyone.
Your own domain
The Custom domain card on the Theme screen links to Settings → Your domain. Type your domain once (such as yourbusiness.com.au) and choose the address for links and portals (such as portal.yourbusiness.com.au). Add the DNS records it lists and press Check now. The same page sets up email from your domain and the address in your customers' quote and payment links. Your dealer portal opens at that address (or at its /dealer page when customers share it). The /dealer/t/ address keeps working either way. A portal slug must be published first.
Put it on your website
Once the theme is published with a slug, Put it on your website shows one line of code. Press Copy, then:
- Shopify: Online Store → Pages, add a page (such as "Trade"), then Themes → Customize, open that page's template, Add section → Custom Liquid, paste and save.
- Any other site: paste it into a "custom HTML" or "embed code" block.
Add data-height="900px" to make the frame taller. Change the slug? Publish, then copy the code again.
If something's not right
- Dealers still see the old look: the change is in the draft. Press Publish changes.
- Slug says unavailable: taken, reserved (admin, dealer, portal, login…) or has capitals or spaces.
- No embed code or "Become a dealer" button: the theme isn't published with a slug yet.
- Own domain not live: the DNS records aren't in yet. It says so beside each record; DNS can take a while to spread.