The customer portal
Give customers a login to see their jobs, quotes, invoices, vehicles and the documents you share with them, approve quotes, pay and raise support tickets. Invite them from their contact page.
Where it is
- Contact → Customer Portal section — Open a contact; the invite is at the bottom of the left column.
- Contact → Shared with customer — Share files with one customer: bottom of the right column (on a phone, the Documents tab).
- Company → Attachments tab — Share files with everyone at a company, or Share to portal on an attachment.
- Workshop job → Notes & files → Files — Share to portal on a job attachment.
- Settings → Customer portal — Branding, support details, visible sections and the portal link.
Settings for this
- Settings → Customer portal — Portal name, colour, logo, welcome text, support contact, review link, which sections show (Documents must be ticked for shared files).
- Settings → Your domain — Open the portal on your own web address.
- Settings → Modules & flow — Workshop on/off also shows/hides Jobs and Inspection Reports in the portal.
- Integrations → Stripe — Lets customers pay invoices by card in the portal.
- Integrations → Customer notifications — Portal access invite wording and channels.
Invite a customer
- Open the contact. They need an email or mobile.
- Expand Customer Portal at the bottom of the left column. On a phone, open the ⋮ menu → Customer portal.
- Choose Send via: Email, SMS or Email & SMS. Options without an address are greyed out.
- Press Send Portal Invite. The status shows Invite sent with its expiry date.
- When they sign in it changes to Accepted (with the date), and their sign-in shows on the timeline.
The invite link lasts 7 days. After that it shows Expired; press Resend Invite.
How customers sign in
They open the link in the invite, or go to your portal link and sign in with their email and password or an emailed Sign-In Link. Copy your portal link from Portal link in Settings → Customer portal.
What customers see
- Home: active jobs, open quotes, invoices due and open tickets, and Needs your attention.
- Jobs: progress of their workshop jobs.
- Quotes: ✓ Accept This Quote, Request changes or Decline.
- Invoices: view, print and pay. Card payment needs Stripe; otherwise they see your bank details. Invoice attachments marked Portal show on the invoice.
- Support: raise and follow support tickets.
- My Vehicles, Documents (the files you share with them, below) and Inspection Reports.
- Help & FAQs: your knowledge-base articles with portal or public visibility (Knowledge base).
- My Profile: their details, password and Notification Preferences.
Share documents with a customer
Files you share show under Documents in their portal (in the menu under their name). Share from:
- One customer: their contact page → Shared with customer, at the bottom of the right column. On a phone it's on the Documents tab.
- Everyone at a company: the company's Attachments tab. Use Shared with customer at the bottom, or press Share to portal on an attachment you already have.
- A job: on the job, Notes & files → Files. Press Share to portal on an attachment, or drop files into Shared with customer. They go to the job's customer and its company.
- Drop one or more files on the box, or click it to pick them (up to 25 MB each).
- Set the Title (for one file), Type, Available until (optional: after that day the customer no longer sees it) and Description.
- Leave Visible in the portal now ticked, or untick it to upload the file hidden.
- Tick Let the customer know to send a portal notification and an email that a new document is ready. It needs a portal invite.
- Press Share file.
Each file shows In portal, Hidden or Expired, and how often the customer has opened it. The eye shows or hides it, the arrow downloads it, and the bin stops sharing it and deletes the file. Above the list it says whether the customer can sign in yet. If not, invite them (above): the files wait for them.
Set up the portal
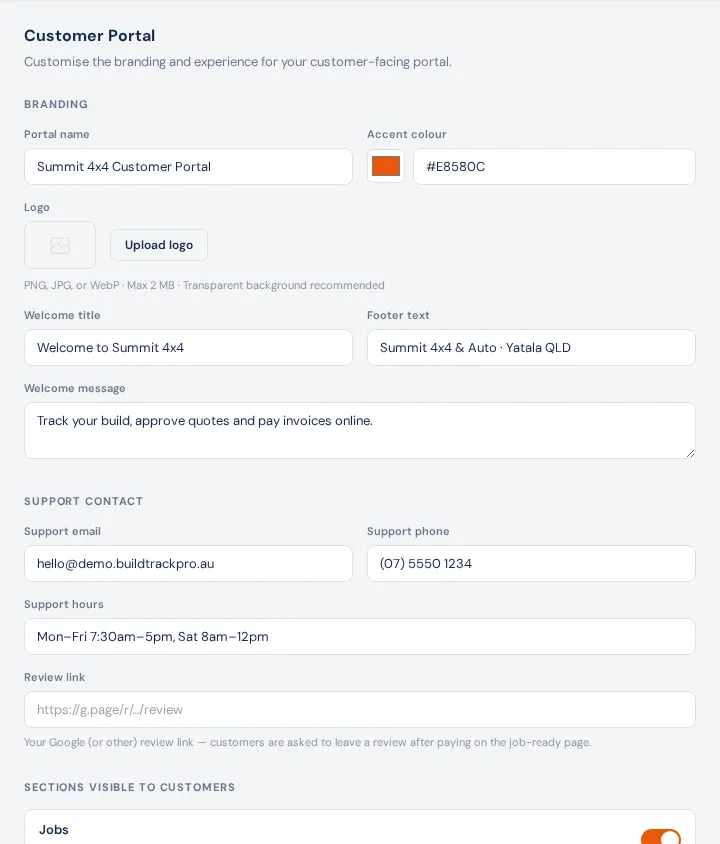
In Settings → Customer portal:
- Branding: Portal name, Accent colour, Logo, Welcome title, Footer text and Welcome message (shown on the sign-in screen).
- Support contact: Support email, Support phone, Support hours and Review link.
- Sections visible to customers: Jobs, Invoices, Documents, Vehicles and Quotes.
- Portal link to share, and Custom domain, which opens Settings → Your domain so the portal runs on your own address (e.g. go.yourbusiness.com.au/portal).
- Press Save settings.
If something's not right
- No Customer portal in Settings: it isn't in your plan. Check Settings → Billing & plan.
- Send Portal Invite is greyed out: add an email or mobile to the contact.
- The SMS invite didn't arrive: check texting is on and they haven't texted STOP (consent).
- Jobs and Inspection Reports are missing for customers: Workshop is off in Settings → Modules & flow, or Jobs is unticked here.
- They can't pay by card: connect Stripe and allow portal payments (Integrations → Stripe).
- The customer can't see a shared file: they need to have accepted a portal invite, Documents must be ticked under Sections visible to customers, and the file must say In portal (not Hidden or Expired). A file shared on a company reaches the contacts linked to that company.